Sunday, July 29, 2012

Implement MDM pattern using WSO2 ESB and WSO2 DSS–Part: 1


Introduction
    In modern complex business data is the key concern out there.Most of the applications try to manage business related data in proper manner with high optimization.One problem comes with data is when organization have multiple data repositories fed with key entities of the business, how to manages that situation without replication key business data. That is where Master data management (MDM) comes in to play.It is an mechanism which can be used to make sure that an organization does not use multiple versions of the same master data in different sections of its operations.In this post I will explain how to achieve one of the patterns in MDM domain using WSO2 ESB (Enterprise Bus) and WSO2 DSS (Data Service Server.) To make the creation and deploying artifacts fast and easy I use WSO2 Developer Studio as the tooling platform.

Scenario
Imagine a company call AB have key business data in data base and two of its internal department applications want the same key data about employees in different formats. Normal use case is these two departments maintain separate data bases for their own use in preferred format and synchronize those data regularly. With that approach they will have to feel several insolvencies.
  1 . Have to maintain number of data base with same entities.
  2 . Make sure the synchronization happens properly otherwise conflicts will make sure systems not work.
There are others as well but this is not the place to discuss about those.
Below Image will explain the requirement in a proper way. In the image I have shown clearly what are the data formats required by both departments.
Scenario
How to achieve that?
We can split this task in to two steps.
1. Expose the master data as service which can be consumed by another application.
-WSO2 DSS can expose data in the master data base in the common format.
2.Transform that common service output in to application scope format and consume.
-WSO ESB can transform in to application scope format.
As shown in the below image we can achieve the requirement by using WSO2 ESB and DSS.
          image
I will use WSO2 Developer studio to build the solution you can find installation guide here. We can use Developer studio to create the data service and create two proxy services that do the transformation within the ESB.
Create Sample Data Base.
You can use SQL file here to create the data base and feed it with sample data. I have use mysql the database and the data base looks like below
image
*Note that in this tutorial I have tried to keep the configuration simple as much as possible and highlight the concept behind that is why I have use simple data base and simple form of data service.
Develop Data Service.
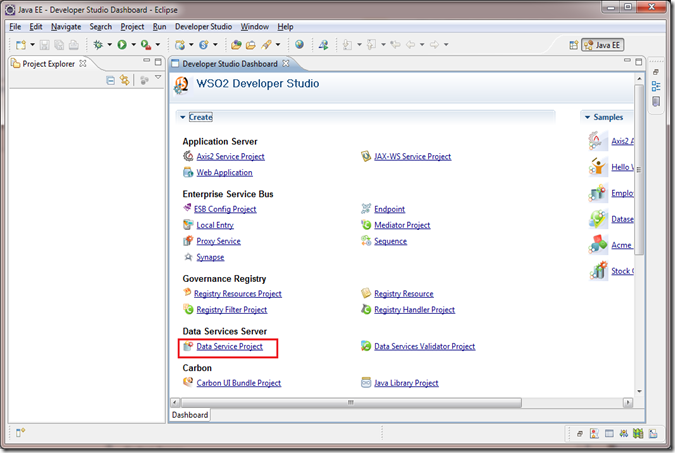
Open the developer studio Dash Board and select Data Service Project shown as below.
dsp1
Select the option call Create New Data Service in the popup wizard.
dsp2 
Fill the relevant fields as shown below.
image
In the next wizard page you can configure your data source configurations as shown below.And click on finish.
image
It will open the data service description language editor where you can edit and configure your data service.
image
Now we have a configured data source and now we need to add a SQL query to retrieve data from the data base.
Right click on the EmployeeDataService element and select Add Query option from the popup menu.
image
Give a name for the query and select the data source as mdmdDataSource
image
Now right click on the newly created query and select Add Sql from the popup menu
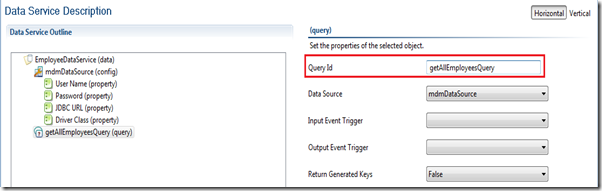
image
As the next step we need to map the data base result to output xml format.To do that right click agin on query element select the Add Outputmapping option from the popup menu.
image
Fill the Grouped by element and Row name fileds as shown below. Grouped by element will be the root element of the out put xml and row name create employee element for each record in the data table.
image
To get the out put xml in our own format we need to map the query out put in to our own element this can be done by adding output mapping elements to the result.Click on the employee result element and select add out put mapping category and select element from that.
image

As shown above our data table has four fields we will map those fields to our output xml elements by filling
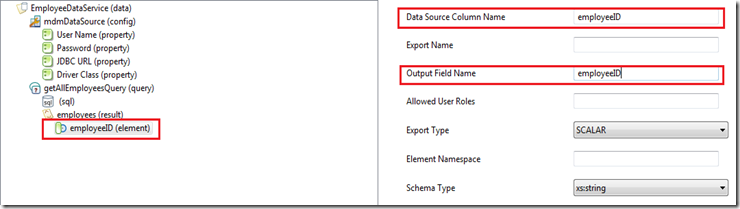
         image
select the newly added element and set the Data Source Column Name and OutPut Field Name as shown above image.And likewise we can map other  three fields also.
After that step we need to map above query to web service operation for that data service description language has element call operation.
Once again right click on the EmployeeDataService select Add Operation option from the pop up menu.
image
Give a name for the operation and since we have a one query in the data service description editor will automatically set the getAllEmployeesQuery for the operation. The final data service will looks like below.


  This data service Exposes the Empolyee data base.
  
    root
    abc123
    jdbc:mysql://localhost:3306/abcompany
    com.mysql.jdbc.Driver
  
  
    select * from Employees


Deploy Data Service.

Now its time to deploy and check the result of the exposed data service.

Go the Developer studio dash board again select Carbon Application Project follow the wizard and we will ended up with created Carbon application Project.Open the pom.xml with Carbon Application Project pom editor and select data service project from the dependencies section.

*Note that we have to put mysql-connector.jar to DSS_HOME/repository/components/lib for connection purpose of the DSS and mysql.

Open the standard Servers tab on eclipse right click and select  New –> Server  then go to the WSO2 category select Carbon 3.2 based server as below.


image

Locate the Data Service server home folder as carbon home folder in the next wizard page.


image

Click finish and it will add the server to the servers view. Start the server after successfully started the server right click on the dss server and select Add/remove from the menu and add the mdmCar to the server and deploy it. 

Developer studio will automatically open the management console on browser you can log in to it using admin as user name and password go to the web service list on the left hand side menu it will show the EmployeeDataService wich deployed successfully.


image

Click on the Try this service link relevant to EmployeeDataService it will lead us to try it toll comes with carbon servers it can be used to see the result of out data service.

Click the send button on the left side the result will appear on the right side panel.


      1
      Diane
      Murphy
      
19,Quaker Ridge Rd,06801
2 Jeff Firrelli
1000,Coney Island Ave,11230
3 Gerard Bondur
2962,Dunedin CvGermantown,38138
4 Vanauf George
1500,Vance Ave Memphis,38104
5 King Tom
1577,Lobby Ave,38804


That is what we expected !!

In the next part we can learn how to use proxy service to do the transformation fro two department specific formats and complete our MDM solution.Hope to publish second part soon. :)

Please find the car file that contain this completed data service here. 

Monday, June 18, 2012

How to develop WS-BPEL for Apache ODE with WSO2 Developer studio 2.0.0


This Tutorial Applyes To:

WSO2 BPS 2.1.2
WSO2 Developer Studio 2.0.0
Eclipse Helios SR2 3.6.2

Introduction

In this tutorial I am going to demonstrate how to develop a BPEL process using WSO2  Developer studio 2.0.0.For those who have not heard about keywords in the these might be the questions in your head now.

1. What is WS-BPEL and Apache ODE ?
WS-BPEL (Business process execution language for Web services)  is a language used for composition , orchestration and coordination of web services. It is a rich language to express the behavior of business process.
Apache ODE (Apache orchestration director engine)  is a system for executing long running process describe using the WS-BPLE standards.
2. What is WSO2 Developer Studio.
WSO2 Developer Studio is a complete tooling platform where you can develop, deploy, test and debug your SOA applications in a very user-friendly manner.
These are the Pre-Requirements for deploying the WS-BPEL process explained in this tutorial, it is required to have the following applications installed in your machine.

Java Runtime Environment 1.6.x
Eclipse Java EE IDE, Version Helios with WSO2 Developer Studio 2.0.x
Apache Axis2 server 1.6.x
WSO2 Business Process Server 2.1.x


So now its time to jump in to work  to make the way smooth we can split tutorial into several phases.

1. Deploying the axis2 service.
2. Developing the BPEL process.
3. Deploying the BPEL process.
Let’s do the the first step.

1. Deploying the axis2 services.

To maintain the simplicity of the tutorial and for the easiness I use the sample axis2 service shipped with WSO2 developer studio.For import sample in to your workspace

1.1 Go to Developer Studio -> Samples  and click on the sub menu item labeled with Axis2 Account Service as shown in the figure below.


Note :-  *To use this sample you have to build it by maven because it needs some dependencies to be fulfilled. And also make sure refresh the project in the workspace and build it (using eclipse) before try to deploy.

Download the Apache Axis2 Server from - http://axis.apache.org/axis2/java/core/download.cgi

extract the zip file and start the axis2 server (for this tutorial  we assume axis2 server up and running on localhost port 8080)

1.2 Right click on the imported project select the menu item Export Project as Deployable Archive as shown in the below image.


1.3 Use the Browse button on the popped up wizard to point the location of the file system to save the .aar file.


If the .aar file correctly deployied on the axis2 console below will be printed.

Now we have successfully completed the first step of our tutorial.

Note :- You can use the axis2 client that shipped with the Account Service Sample to test the sample.

Traverse down the class call AccountServiceClient in the client package and just run it self explaining  console output will print.

1.4 Generate the WSDL of AccountServiceSample.

As you can see the above image of right click menu of the AccountServiceSample project selecting the Generate WSDL option you can generate WSDL and point it to any system location you want.

2.Developing the BPEL Process.

2.1 Creating BPEL Project.

Click on Open Dashboard option on Developer studio menu we have seen earlier.It will open the WSO2 Developer studio dashboard shown as below.


click on the BPEL Workflow link button under the Business Process Server category.

2.1.1 It will trigger the Create New BPEL Project wizard as below.


Select the Create New BPEL Workflow option and press Next button and give a name for the BPEL process.


we can change the maven information here if we need. WSO2 developer studio have the fully maven integration for all the project types created using it.


The project structure created by the wizard will same as below.


2.2 Developing BPEL process.

Note : - Chage the perspective to BPEL by Window - > Open Perspective -> Other -> BPEL Perspective.

Now we need the WSDL of the AccountServiceSample service .For that just right click the AccountServiceSample project and select the menu option Generate WSDL. point the generated WSDL in to AccountDemoProcess project.

Open the BPEL on BPEL editor and Remove the dummy component from the created BPEL pointed below.

Go to Control2 category in BPEL editor and select Sequence element from there and drag drop it to just after the receiveInput element.


Now we need to add invoke element to call the create account operation.For that go to Actions category select Invoke drag and drop in to the AccDemoSeq.


Click on the CretaeAccountOperationInvoke element and go to the Details tab in properties view select the combo box in front of the Partner Link filed. Select the Create Global partner Link option.


click on the Add WSDL button point the AccountService.wsdl that we added earlier to the AccountServiceDemoProcess.Click the OK button. It will popup the Create New Partner Link Type dialog give the name of Partner Link Type as

.

In the next pop up dialog give a name for the partner link AccountServicePLT

.

On the next dialog window it ask for the role for this partner link type. Give the role name as AccountServiceRole and select the the port type as AccountServicePortType as shown below.


click on the finish button.

now we have to select the operation for this invocation.Back again to the properties view and select the the createAccount operation from the combo box as below.


Note : - make sure select the operation and double click the same operation on quick pick view on the right side.It will generate the request response configurations for us otherwise when we are in the variable assignment level we will have unwanted problems.


Before go further we should rename the variables for the sake of convenience. We can select the variable from the Variables section as shown below and using properties view we can change the names.


AccountOperationsPLRequest -> createAccountRequest  (take dummy string argument)

AccountOperationsPLResponse -> createAccountResponse (account number as int)

AccountOperationsPLRequest1 -> creditAccountRequest.(account number and the amount to credit as input arg).

AccountOperationsPLResponse1 -> creditAccountResponse (operation successful or not as boolean)

As per the WSDL cretaeAccount operation take string argument (dummy) and return newly created account number as an integer value. So we have to give the dummy assignment to that operation. For that add assign element from the palette.To configure the assignment click on the assign element go to properties view select details tab click on new button.


The next step we want is add some credits to the newly created account. For that we have to invoke the creditAccount Operation.But the creditAccount operation takes the account number and the amount as arguments. Same as above we can add the creditAccount operation as an invoke element.

To take the account number and submit it to crditAccount Operation we have to add assign element from the palette after the createAccount operation as below.Give the name of the assingment as AssignAccNumTocreditAccOp.

As we discussed earlier now we need to 

   creditAccountOperation  =  output of the creteAccountOperation.

now it is very easy to do the assignment


editor will ask to initialize the variables, allow it otherwise we have to take care of the initialization.

For the easiness we are hard coding the credit amount.To do that click New button and again and change the From : combo box to Fixed Value and put  ‘12000’ to the editable text box .on the To : section traverse to creaateAccountRequest -> parameters -> amount select it. Then the credit amount will set to 12000 when the operation invoke.  


now we need to check the state of credit account operation for that we are using if element. drag and drop the If element from the palate as shown below

name it as CheckCreditState. We need to set the condition.Go the properties view and details tab click on Create New Condition button. copy and paste below expression in the editable area.

$creditAccountResponse.parameters/ns:return = true

Now it’s time to  invoke check balance service depends on the condition that we have set. drag and drop invoke element to the if block as shown in the below image and configure it to invoke the check 

balance service same as described above.


And also we need to submit the account number to this operation also to achieve that use the assign element described above.


now we need to copy the checkbalance operation out put to reply out put element for that we can add   assign element same as before. so what about if condition fails? so we need to add else element by right click on the if block and selection Add Else option. Drag and drop an assign element o n to it and configure it to assign false to reply on element.
The final Bpel configuration will look like below .


And also make sure the deploy.xml configurations set as below.


3. Deploy the BPEL artifact.

3.1 Deploy in Apache ODE.

Right click on your AccountServiceDemoProcess project and select the Export project As a Deployable Archive.

Locate the file system location that you want to save the  artifact.


it will create AccountServiceDemoProcess_1.0.0.zip file.

go to apache ODE management console select deployment tab give the process name as AccountServiceDemoProcess  locate the artifact file that we have created from the system click on ok.
It will create AccountServiceDemoProcess_1.0.0.zip file.
Go to apache ODE management console select deployment tab give the process name as AccountServiceDemoProcess  locate the artifact file that we have created from the system click on ok.
Put the extracted zip content in to directory call AccountServiceDemoProcess in ODE instalation diractory/WEB_INF/processes.

3.2 Deploy in WSO2 BPS (WSO2 Business Process Server)

You can download the WSO2 BPS from [1] and go to installation  directory  then go the bin directory if you are using Linux run the shell script call wso2server.sh or otherwise in windows run the wso2server.bat file to start the server.

You can create the deployable archive via above option and  go to the management console of wso2 bps by https://localhost:9443/carbon/ and login to the management console using admin and user name and password.Management console will be shown as below.


Click on the button labeled with Add BPEL on the left panel It will lead you to below page  from there you can upload the .zip file you have created using WSO2 developer studio.

You can try out the process using try it tool on WSO2 BPS.

Source Code and the axis2 archive can be downloaded from Here

Monday, August 22, 2011

Topic-Specific Web Resource Crawling for Quality Controlling ofAutomated Search Engines – (UNDERGRADUATE RESEARCH PROJECT).

Search Engines  had played a vital character in my life since I entered to the university as a engineering undergraduate.

After completing my  first year  in university I had realized that It is governed by “lecturing –>examine” not “Self learning-> Work Hard on real things” so in that time it was a  “POOOOVH”  on my dreams. I wanted to be some one that really working on advanced stuffs..think different than others..and simply not a student that know all the things in the books and know how to solve the differential equations but does not know how to use it to make something  which comfortable the human being.

So I knew the time had come to make a turning point.I had decided to learn software engineering subjects ,Computer languages, frameworks by myself because my subject list did not provide my requirements.Life was hard because of my decision.But I have the spirit to fight with it.On that quest Google was my friend, teacher…To find E-Books,Tutorials Demos, Bleeding edge of the technology,What are movements of the world economy ,how it affects to my future career,What’s up with the current job market,job requirements,International level qualifications much more…

That’s how I have make a incomparable friendship with Google.Working more than three years together I know how Google behaves with different kind of search methodologies.If you not aware of it please visit  Basic search help : Google you can find set of examples that describes how to use Google well. But still Google has very significant problems.

1. Result page full with junks

here is the example for it.. just imagine you wants find a e book on eclipse IDE plug-in development. So I am using “eclipse plugin eBook download” as my search query.

image

This is the Google's top link for it.

image

Just because of having “Eclipse plugins free eBook at …” as a page content ,Google gives us the page with no relevant information of our search.How sad.?

2.Wasting the valuable time of the seeker.

3.Not identifying the exact requirements of the seeker.

Normally when we are searching we just use one or two key words.

image

It just pops up with the bunch of links in (0.16 seconds) ,But the thing is when we are searching we have list of thing we wanted to know but not entered in the search query.For an example above I was searching to buy a laptop so I wanted to know the prices,brands,performance. ..ext. .Those information should be there in the first 10 links Google gives us but if you aware enough of Google results you will be realized the quality is not there.

4.Give junk results repetitively even seeker expand the query length.

 As I mentioned above the junk results given by the Google will repetitively pops up if we change the search query length or the meaning.

1.Search using query as “Eclipse plugin eBook download free”.

image

Still the junk link is there.

2.Search using query as ”eclipse plugin development eBook download free”.

image

How sad Still the junk link is there.

I have already visited it and it was confirmed that that site does not contains the result that I want but still Google suggesting the result for me.Simple use of cookie it can be omitted those visited result.

So it is about my Friend Google.Now lets talk about us.Our undergraduate research project is to make a “Quality Controlling” mechanism of above results using “Topic-Specific Web Resource Crawling “. It was an idea from my friend and the navigational component on this quest Amith.

What is out Solution?

•AI based focused crawler automatically builds a web directory.

1.-AI based + Identified user expectations

2.-Automated

3.-Eliminate junk results as much as possible

4.-Web Directory is updated more frequently

•System Architecture

image

•How we did it?

–Get information from human-edited directory – ODP (*Human Edited Web directory)

–Identified most frequent keywords in a particular category

image

•URL Finder

each time fetch combinations of keyword sets to Google and store the results.

image

•Web Crawler

crawl the resulted websites and count the related keyword frequency for the use of stat analyzer.

•Link Analyzer

Eliminate same results in the URL pool.

•Calculate Keywords p.u values of each websites

image

image

*In the above Graph (generated using system result submitted to MATLAB) shows the first result (top result) of the Google is poor in frequency of the key word that we are searching than the 2nd and 7th result key word frequency.So it is obvious that top results of the Google not the result that we are expecting as users.

  • Statistics Analyzer

imageimage

*Above Screen shot shows the top ranked sites according to out system results for keyword “Diamond”.

•Improvements

- contribute more sources to find relevant keywords

- Human supervision is better

- use phrases than keywords

So It was privileged to contribute this stuff and this is one of the greatest things that I  have done in my university life other than my Undergraduate Project humiee.It was a incomparable experience that inspired myself.Because I always wanted to learn for the quest not for the marks.