Hi,
This is my second post.Since first one in October 2010 I was very busy with my academic and Internship stuffs.So to day I will show you step by step how to develop a Google map application using PHP/MYSQL.
Fist of all you must get a key for using Google maps so go to
http://code.google.com/apis/maps/signup.html and follow the steps then you will have a key for using Google maps.Please read the terms and conditions for using that.

.
To follow this tutorial you must have to have these tools below .I will tell for both windows and Linux users how to sets up the infrastructure.
For Linux Users.
1.Just Google “How to install LAMP”
-> you will have thousands of links how to do that.I am not going to tell how to do that here.

For Windows users
1.Download XMAPP from here
http://www.apachefriends.org/en/xampp-windows.html
2.install it on your computer.There will be a nice GUI so just start the MySQL server and Apache Server.
Now we have the infrastructure to run the PHP codes and powered it by the MySQL database connection.

(Both linux and windows users Linux users have to start Apache and MySQL manually On the Terminal)
Now the Second step.For this step we should have some IDE because it is convenient when we go in to further when code become complex it will not easy to find error or fault when we use direct development scenario.However I know most of Linux users like vim and on the other hand windows users notepad for this kind of stuff its up to you.But for the easiness of me and beginners who will see this I am using Net beans IDE for this purpose.
If you do not have it download it from
here.
After install it.Now you have the full infrastructure to develop our application.

(Please check weather your apache server and MySQL server running properly you can do it easly by googling one query to how to do so

)
open Netbeans you will have screen like below.
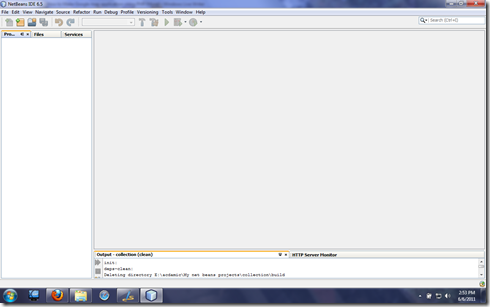
Go to File->New Project
Then a wizard will appear and find the PHP item on the right panel and select it.It will look like below.
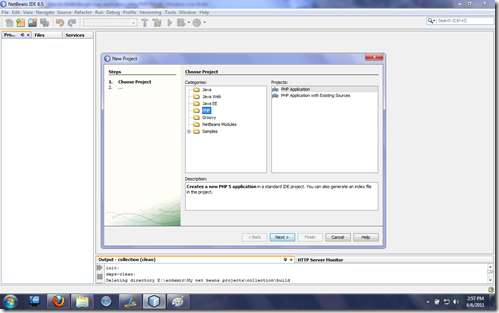
Select PHP Application from the right panel and press next…
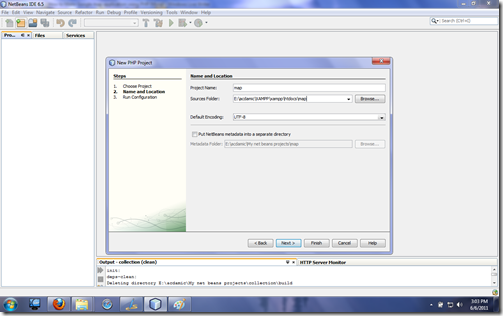
Then give the details for the next wizard page it will ask the project name –> give it as “map”
and the most important thing is set the project location in the right place in the relevant server in XAMPP it is “ XAMPP\xampp\htdocs” in WAMP or LAMP it is “www” folder.
see the below screen shot if any droughts post it on the comment section.

.
Press Next –> you can go to the next wizard page section it will ask the running configurations for this application.It will look like below and leave the default settings but do not do things blindly read those fields and what are they up to

.
Press the finish button and then you will have a newly created PHP project with index.php file.

hhmmh…tired ha..do not give up I tell you hoe to do this.
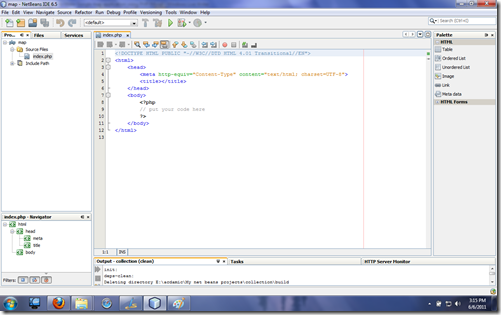
This is how tit will looks like.
if you want to cheek your settings juzt put your name in to the auto generated php code

<?php
echo "Your name";
?>
now save the content and rigkt clik the project and select run if every thing is ok your browswe will apper and show your name just like below.
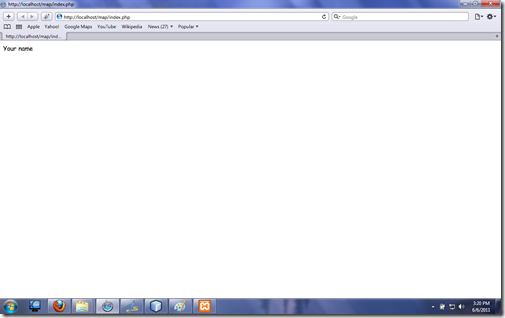
Now tis time to create out Google map application.
As the first step we should create a Data base.It is very simple I will give you the sql for create the data base for this application.

For that type this Url in your browser address area.
http://localhost/phpmyadmin/
create a data base with name “tankmap”

Download tankmap.sql file from
here.
After creating the data base go to the “Import” tab in the PhPMyAdmin dash board..

now locate the tankmap.sql file in your file system and make sure to select the radio button “SQL” from “Format of Imported files Section”.

huuyaa..now you have the database that we want develop this application.

…
Lest begun the code….
1.Right click the Source Files Filder on the Project go to New->PHP file

give the name as “dbinfo” copy past the below content to it.

<?php
$username="root";
$password="";
$database="tankmap";
?>
It is to hold the database related details ..
now the most interesting part is how we going to consume the database we created in our map??

PHP is for that….

in this tutorial I have developed a PHP file that can make XML file from reading the data base..OK OK I know things getting bad..back to code then I will explain every thing it a promise.

2.Crate a new PHP file call xml_gen.php
add these content to it I have add comments for the code and I will explain those below.
createElement("tanks");

$parnode = $dom->appendChild($node);


// Opens a connection to a MySQL server


$connection=mysql_connect (localhost, $username, $password);

if (!$connection) {  die('Not connected : ' . mysql_error());}


// Set the active MySQL database


$db_selected = mysql_select_db($database, $connection);

if (!$db_selected) {

    die ('Can\'t use db : ' . mysql_error());

}


// Select all the rows in the tanks table


$query = "SELECT * FROM tanks WHERE 1";

$result = mysql_query($query);

if (!$result) {

    die('Invalid query: ' . mysql_error());

}


header("Content-type: text/xml");


// Iterate through the rows, adding XML nodes for each


while ($row = @mysql_fetch_assoc($result)){

    // ADD TO XML DOCUMENT NODE

    $node = $dom->createElement("tank");

    $newnode = $parnode->appendChild($node);

    $newnode->setAttribute("tankname",$row['tankName']);

    $newnode->setAttribute("lat", $row['latitude']);

    $newnode->setAttribute("lng", $row['longitude']);

    $newnode->setAttribute("damtype", $row['damtype']);

    $newnode->setAttribute("damheight", $row['damheight']);

    $newnode->setAttribute("nofCanals", $row['nofCanals']);

    $newnode->setAttribute("capacity", $row['capacity']);

    $newnode->setAttribute("presentCondition", $row['presentCondition']);

    $newnode->setAttribute("maintainAuthority", $row['maintainAuthority']);

    $newnode->setAttribute("surface", $row['surface']);

    $newnode->setAttribute("catchment", $row['catchment']);

    $newnode->setAttribute("purpose", $row['purpose']);

    $newnode->setAttribute("nofFamerFamilies", $row['nofFamerFamilies']);

    $newnode->setAttribute("nearestTown", $row['nearestTown']);

    $newnode->setAttribute("rainfallData", $row['rainfallData']);

    $newnode->setAttribute("image", $row['image']);

}


echo $dom->saveXML();


?>
You must see the out put of this php file .You can see it using IE past the url as
http://localhost/map/xml_gen.php then you will have a generated xml content like this.

here goes the explanation


3.Now its time to create the presentaion layer of this application and use the Cooool Google Map Api …
create a new HTML file and copy this content on to it…
<!DOCTYPE HTML PUBLIC "-//W3C//DTD HTML 4.01 Transitional//EN">

<!DOCTYPE html PUBLIC "-//W3C//DTD XHTML 1.0 Strict//EN" "http://www.w3.org/TR/xhtml1/DTD/xhtml1-strict.dtd">

<html xmlns="http://www.w3.org/1999/xhtml">

    <head>

        <meta http-equiv="content-type" content="text/html; charset=utf-8"/>

        <script src="http://maps.google.com/maps?file=api&v=2&key=ABQIAAAAR0TWf73rulOP_SnETQPFKxRj5djmSsmVAgDaRb1psFcJlThRhxSjxifqM96NjrBsBn2XrZWSE-QQqQ"

                type="text/javascript"></script>

        <link type="text/css" href="css/style.css" rel="stylesheet" media="all" />

        <script type="text/javascript">

            //<![CDATA[


            var iconBlue = new GIcon();

            iconBlue.image = 'http://labs.google.com/ridefinder/images/mm_20_blue.png';

            iconBlue.shadow = 'http://labs.google.com/ridefinder/images/mm_20_shadow.png';

            iconBlue.iconSize = new GSize(12, 20);

            iconBlue.shadowSize = new GSize(22, 20);

            iconBlue.iconAnchor = new GPoint(6, 20);

            iconBlue.infoWindowAnchor = new GPoint(5, 1);


            function load() {

                if (GBrowserIsCompatible()) {

                    // var map = new GMap2(document.getElementById("map"));

                    var map = new google.maps.Map(document.getElementById('map'));

                    map.addControl(new GSmallMapControl());

                    map.addControl(new GMapTypeControl());

                    map.setCenter(new GLatLng(6.082083, 80.542277), 13);

                    map.enableScrollWheelZoom();


                    GDownloadUrl("xml_gen.php", function(data) {

                        var xml = GXml.parse(data);

                        var markers = xml.documentElement.getElementsByTagName("tank");

                        for (var i = 0; i < markers.length; i++) {

                            var name = markers[i].getAttribute("tankname");

                            var damtype = markers[i].getAttribute("damtype");

                            var point = new GLatLng(parseFloat(markers[i].getAttribute("lat")),

                            parseFloat(markers[i].getAttribute("lng")));

                            var damheight = markers[i].getAttribute("damheight");

                            var nofCanals = markers[i].getAttribute("nofCanals");

                            var capacity = markers[i].getAttribute("capacity");

                            var presentCondition = markers[i].getAttribute("presentCondition");

                            var maintainAuthority = markers[i].getAttribute("maintainAuthority");

                            var surface = markers[i].getAttribute("surface");

                            var catchment = markers[i].getAttribute("catchment");

                            var purpose = markers[i].getAttribute("purpose");

                            var nofFamerFamilies = markers[i].getAttribute("nofFamerFamilies");

                            var nearestTown = markers[i].getAttribute("nearestTown");

                            var rainfallData = markers[i].getAttribute("rainfallData");

                            var imagePath=markers[i].getAttribute("image");

                            if(imagePath == ""){

                                imagePath = "Image Not Availabe at this time";

                            }

                            var marker = createMarker(point, name, damtype,damheight,nofCanals,capacity,presentCondition

                            ,maintainAuthority,surface,catchment,purpose, nofFamerFamilies,nearestTown,rainfallData,imagePath);

                            // var marker = createMarker(point, name, damtype,damheight);

                            map.addOverlay(marker);

                        }

                    });

                }

            }

            function createMarker(point,name,damtype,damheight,nofCanals,capacity,presentCondition

            ,maintainAuthority,surface,catchment,purpose, nofFamerFamilies,nearestTown,rainfallData,imagepath) {

                // var marker = new GMarker(point, customIcons[type]);

                var marker = new GMarker(point,iconBlue);

                var tabs = [];

                // Create tabs and add them to the array


                var html = "<b>" + name + "</b> <br/>"  +'<small>Dam Type:</small>'+ '<small>'+damtype+'</small>'

                    + "<br/>" +'<small>Dam Height:</small>'+'<small>'+damheight+'</small>'

                    + "<br/>" + '<small>Num Of Canales:</small>'+'<small>'+nofCanals+'</small>'

                    + "<br/>" + '<small>Capacity :</small>'+'<small>'+capacity+'</small>'

                    + "<br/>" + '<small>Present Condition :</small>'+'<small>'+presentCondition+'</small>'

                    + "<br/>" + '<small>Authority :</small>'+'<small>'+maintainAuthority+'</small>'

                    + "<br/>" + '<small>Surface :</small>' +'<small>'+surface+'</small>'

                    + "<br/>" + '<small>Cathment :</small>' +'<small>'+catchment+'</small>'

                    + "<br/>" + '<small>Purpose :</small>' +'<small>'+purpose+'</small>'

                    + "<br/>" + '<small>No Of Farmer Families :</small>' +'<small>'+nofFamerFamilies+'</small>'

                    + "<br/>" + '<small>Nearest Town :</small>'+'<small>'+nearestTown+'</small>'

                    + "<br/>" + '<small>Rain Fall Data :</small>' +'<small>'+rainfallData+'</small>';


                var content = '<div id="info">'+

                    '<img src="'+imagepath+'" alt=""  width="150px" height="150px"/>' +

                    '<h2>'+name+'</h2>' +

                    '</div>';


                tabs.push(new GInfoWindowTab('Information', html));


                var tab2 = new GInfoWindowTab("Location", content);

                tabs.push(tab2);


                GEvent.addListener(marker, 'click', function() {

                    marker.openInfoWindowTabsHtml(tabs);


                });

                return marker;

            }


            //]]>

        </script>

    </head>


    <body onload="load()" onunload="GUnload()">

        <div id="map" style="width: 100%; height: 100%"></div>

    </body>


</html>
Explanation
1.This is how we use the obtained Google key.

2.Create the marker for our map

3.The locad function…

4.Extracts data from the xml

5.The rest of the code responsible to make the marker a fancy one

..
If you did it with me correctly then enter this url on your browser..
http://localhost/map/map.html
yahooo..
this will be the out put
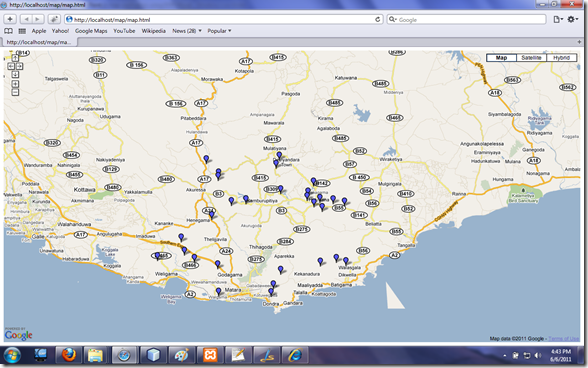


So We make it (Note that if want those fancy images there add those in to folder call images/YOUR_IMAGE.jpg.png ext)…
Thanks..

 just pops up my idea of music search and I wanted to know how they do that.Because it is a reaching approach of my crazy idea. So here begins the investigation.


